Safety First:
Despite what you may see in photos or descriptions of our projects - ALWAYS follow manufacturer's safety guidelines when using tools or equipment. Always wear safety glasses, gloves and full body-armor if necessary. While it may appear we don't always do so, we can not be held responsible if you do not.

Home Roasting Green Coffee Beans
 If you are a coffee drinker, you know the retail prices have been going up and might skyrocket according to several news articles including this one "Coffee prices skyrocket as fungus kills high-end beans."
If you want to buy in bulk to save on future price increases, the first instinct is to hit the nearest discount membership club and buy a bunch of roasted beans. However, roasted coffee beans have a rather limited shelf life and ground coffee much less - unfortunately we did not know this fact before following that initial instinct.
Green coffee beans have a shelf life of 10+ years if properly stored. As of the date of this post, we are able to buy some very good high end green beans for around $3.50 a pound. We aren't talking Folgers here - this is GOOD coffee.
The roasting process is easier than you may think and you've never had a really "Fresh" cup of coffee until you have brewed up some home-roasted beans.
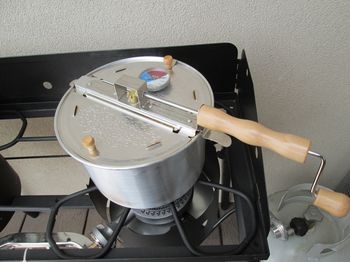
There are numerous methods of roasting beans. You can use a heavy pot on the stove top, a cookie sheet in the oven, use an air popcorn popper, or a hand-crank stove top popcorn popper. We chose the "Whirley-Pop" stove top popcorn popper for a couple of reasons.
Roasting coffee does NOT smell like roasted coffee. During the roasting process, there is a fair amount of steam and smoke released - so unless you have a very well ventilated kitchen, you may want to avoid inside roasting. Since we are off-grid, we try to avoid an electrical appliance when a non-electric option is available. The "Whirley-Pop" stove top popper was perfect - inexpensive, non-electric and can be used either inside or outside. We use the side burner on the grill or propane cook stove.
 There are tons of videos on YouTube for each of the processes mentioned above. Additionally, this site has some very good printed instructions for all of the roasting methods. I won't try to duplicate the level of detail for the "Whirley-Pop" method that can be found on the site just mentioned - but this post will cover the basics and what we found works best.
The right sidebar contains links for more info and supplies. NOTE: I recently added a grill thermometer shown in the photos. This is totally optional. The first few batches I roasted turned out perfectly without a thermometer. I added the thermometer to experiment with different levels of roasting (French, Spanish, Full City) which require better temperature control.
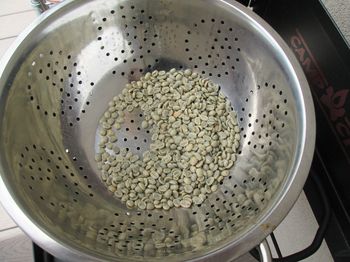
Step 1: Preheat and Add Beans
Its best to preheat the popper before adding the beans (about 2 cups is a good amount). Most of the instructions I found say to preheat to 400 degrees. I found this to be a bit too hot. By the time I finished pouring in the beans and started cranking - some burn spots had already appeared.
If you don't have a thermometer, don't worry, the beans will roast even if you start cold - it will just take longer. About 360 degrees is when I add the beans. You probably want to wear gloves if using a gas/propane burner as it gets hot around the cranking handle.
Step 2: The First and Second Crack
 It is necessary to keep the beans moving throughout the process - which is why the Whirley-Pop works so well. About 5-6 minutes into roasting you will hear the beans make the "First Crack" - sort of like popcorn but pretty subtle. Shortly after this the beans should be turning a light brown to caramel color and you may see some of the bean husks burning off. You probably want to turn down the heat at this point. You will have smoke and steam develop, not to worry unless it really smells like the beans are burning instead of roasting.
About 5-7 minutes later you will hear the "Second Crack." At this point the beans should be a darker brown and all the husks should have come off. If you like a light roast you can now move to Step 3. From the Second Crack forward is all a matter of preference. HOWEVER, please note the beans will move quickly at this point into the darker roasts. It is also important to note the beans will continue cooking for a while after you remove them from the Whirley-Pop - so you want to do so before they reach the level of darkness you are shooting for.
Step 3: Straining and Cooling
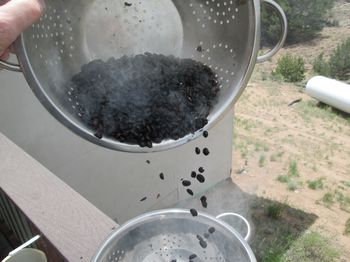 For this step you will need two collanders (or larger strainers or pots). Pour the beans into one of the collanders and pour them back and forth between the two leaving enough room for the burnt husks and small particles to blow away. This process also helps cool the beans a bit. Do this numerous times until most of the debris is removed.
Step 4: Allow to Out Gas and Cool
The beans will reach their best flavor 4-12 hours after roasting. During this time they will continue to cool and out gas (now they smell like roasted coffee). Leave in an open container for 4 - 24 hours. We keep ours in a mason jar - but any airtight container will work. Roasted beans are considered "Fresh" for a week after roasting.
Step 5: Enjoy!
In summary, home-roasting is easy, can be fun (it has become a hobby for us) and produces the best coffee you'll ever have - for less money than mass-roasted, flavors added, brand name beans.

Supplies Needed:
A Whirley-Pop type popper.
Gloves
Two Collanders or Strainers
2 cups of Green Coffee Beans
An idea of what roast you like
Where To Buy:
You can buy a Whirley-Pop (aluminum) or a stainless steel model and optional thermometer and collanders online. We happen to find them on Amazon - hyperlinks go there.
Sweet Maria's also sells the above plus green coffee beans.
If you like to do the auction route, there are numerous suppliers on Ebay. However, if you want to buy in bulk (5 - 100 lbs) - this site is awesome - great variety of beans, good prices and good service. It is our favorite source.